There are many excellent puzzles to solve within the 152 Shrines found within the enormous world present in The Legend of Zelda: Tears of the Kingdom, and the Jikais Shrine is one of the best offerings. The premise of this Shrine is simple yet effective: Escape.
Each puzzle you must solve within the Jikais Shrine has you escape a room with one or more of Link's new abilities, having you rack your brain trying to figure out a master plan to break out of your imprisonment. You can find the Jikais Shrine in the eastern portion of the Mount Lanayru region.
Jikais Shrine (Jailbreak) Walkthrough

Escaping the various rooms of the Jikais Shrine will require you to use several of Link's new abilities, making his Ascend and Ultrahand immensely valuable. You can find the solution to all puzzles and how to reach the Treasure Chest in the sections below!
Jikais Shrine First Puzzle Guide


The first puzzle of the Jikais Shrine is oddly the most involved one, as you will immediately see several large blocks on the wall as soon as you enter. There will be two blocks on the left side and two on the right. You must move them in a specific way and order to escape the room.
Your first step is to focus on the two blocks on the right. Move the bottom-most block all the way to the left, then move the upper-most block to the right but have it hang slightly over the ground that has been exposed from moving the first block.
Then, go to the left side of the room and move the bottom-most block all the way to the right and the upper-most block as far to the left as it can go. After doing this, return to the right side of the room and follow the next steps.
Once back on the right side of the room, stand underneath the upper-most block and use Ascend to pass through it to get on top of it. From here, you can Glide down to the bottom-most block on the lefthand side of the room.
Since you rearranged these blocks earlier, you can safely land on this block without bumping into the other one. Once you're on top of the bottom-most block on the left side of the room, use your Ultrahand to move the upper-most block above the one you're on.
Ensure you get the block above you and underneath the opening above you. When you have it properly positioned, use Ascend to get on top of it and climb into the opening. From there, use Ascend once more to get into the next area, solving the first puzzle!
Jikais Shrine Treasure Chest Guide


When in the following area, you will see a Treasure Chest sitting atop an elevated platform that sits high above the ground. To get this Chest, simply stand underneath the platform and use Ascend to pass through it and onto the same platform as the Chest.
Open the Chest to receive a Magic Staff with an Attack Potency of Four. Don't let it fool you, though, as its power comes from attaching Gems to it to draw out Elemental Damage!
Jikais Shrine Second Puzzle Guide


With the Treasure Chest acquired, look straight ahead from it to find a Long Stone Slab leaning against a pillar. Grab hold of the Long Stone Slab with your Ultrahand and flip it horizontally so it's lying face-down.
Next, raise it above the pillar it was leaning on and place it on top of it, but have a portion of the Long Stone Slab hang over the ground you're currently standing on. You can angle it to give yourself more room if need be.
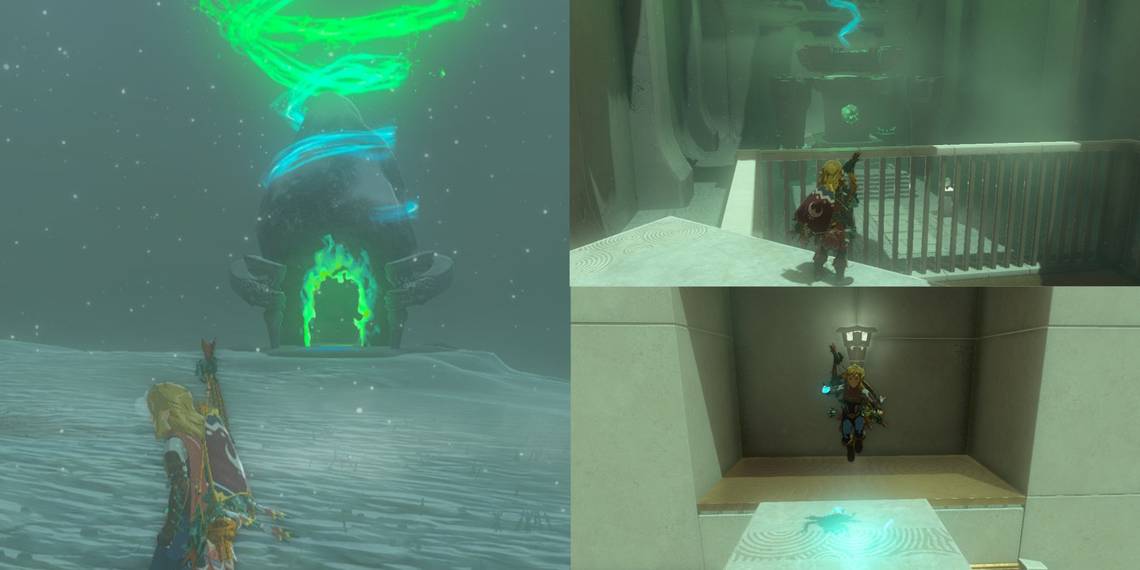
After getting it in position, use Ascend to pass through the part of the Long Stone Slab hanging overhead. Now you can use Ascend again to pass through the ceiling, but there's an interesting aspect to this section of the Shrine.
As pictured above, if you Ascend through the ceiling at the right spot, you will actually come up through the ground beside the cell in the next room, meaning you will complete the Shrine if you do this and can skip the next puzzle altogether.
If you happen to do this, then you can claim your Light of Blessing and be on your way. If not, jump to the next section to finish things up!
Jikais Shrine Third Puzzle Guide


If you were unfortunate enough to land yourself in the cell after Ascending through the ceiling, you can finish the job by grabbing the Long Stone Slab behind you (opposite where the Light of Blessing is) with your Ultrahand.
From here, lay the Long Stone Slab down horizontally so that it's face down and place it over one of the corners of the cell. Part of the Long Stone Slab should be hanging over the inside of the cell, enabling you to Ascend through it.
Once you're on top of the Long Stone Slab, you can jump outside the cell and claim your Light of Blessing, completing the Jikais Shrine!