Quick Links
The Legend of Zelda: Tears of the Kingdom has a lot of shrines. 152, to be exact. That's more than Breath of the Wild had - even with its Champion's Ballad expansion. Some are simple. Others are real brain-teasers. And then there are the Proving Grounds shrines, which strip Link's equipment down to nil.
Proving Grounds shrines are all about survival. Find what you can. Forge what you can. Among them, one of the toughest is the Otak Shrine located in the Hebra region. This one's been stumping players, and rightly so. Here's our advice!
Finding The Otak Shrine

Some shrines are nigh-impossible to miss. The Otak Shrine is not one of them. You can find the Otak Shrine in the Hebra region near the northwestern-most corner of the Hyrule map, or arguably directly there. Head to the Icefall Foothills here, and wander about until you see coordinates reasonably close to the following: 4427-3781-0224.
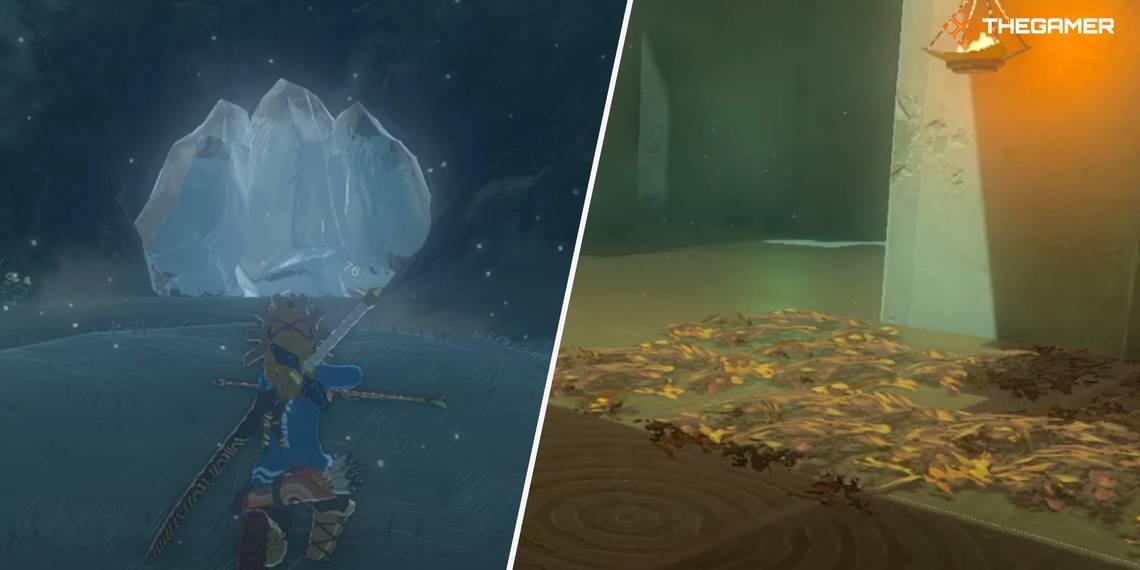
From here, rotate the camera until you notice your proximity to a block of ice. When all else fails use fire; there are plenty of ways to accomplish this in Tears of the Kingdom, but the simplest is probably a Fire Arrow or Fire Keese Eyeball. Shoot the block of ice. You'll note that there are numerous thinner blocks behind it, but you don't really need to waste resources melting them. You can just jump over them instead.

A 'Discovery' notification should ping informing you that you've found Icefall Foothills Cave. The blocks in the back here will need to be melted before you can progress. Shortly past them, look for the sheet of ice on the ground and shatter it (you can just jump on it a few times). This will drop you to a lower level. You'll probably be OK without tapping into your glider before you touch the ground, but maybe tap into it just in case.
There are several Bokoblins here, possibly including some higher-ranked ones, and they'll likely spot you as soon as your descent is complete. Be on guard!
Above where the Bokoblins have spawned, near the top of a wall, is another sheet of ice to blow open. Doing so will reveal the Otok Shrine!
Surviving The Otak Shrine: The Left And Right Constructs

Finding the Otak Shrine is a bit of an endeavor in its own right, but don't relax on your way in. The challenge here can be significant, especially if you're a bit low on hearts. Grab the Old Wooden Bow, Thick Stick, and ten arrows to your left near the entrance.
Ahead, you'll see a rock hanging upside-down that looks like it can be shattered. We don't really have the tools for that just yet, but more importantly, multiple Construct enemies are on the raised platforms nearby. Go after the ones to your right first.
You can somewhat even the odds against the Constructs by shooting one of your arrows into the rope with a lantern hanging from it. The ensuing explosion should do minor damage to them, but if you send the nearby barrel swinging into the lit post as they inevitably pursue you, you will kill them outright. Or disable them. Or whatever it is one does to Constructs.
A Zonaite Shield, Zonaite Spear, and other loot are your rewards from this pair of Constructs. Unfortunately, the Constructs on the left don't have any barrels hanging around nearby, at least not that we've found. But with the Zonaite gear, you'll stand a much better chance of victory.
Surviving The Otak Shrine: The Constructs Still To Come

There are even more Constructs behind you, on the raised platforms nearer to the shrine's entrance. The good news is, there are also more lanterns. If you can time it just so, have one of the Constructs pursue you toward the lantern, blast it, and keep the Construct close enough to the leaves beneath the lantern to really do some damage.
If you can't pull that off, hey, it happens. Just keep swinging at it until it goes down, but be warned: the other Construct will likely see you and shoot arrows at you from afar. Take it out in whatever fashion you managed to bring down its friend.
Once this sixth and final Construct is beaten, you'll receive that loveliest of Proving Grounds shrine messages informing you that your equipment's been returned. A gate will swing open, and you can move forward to claim your prize. Spoilers: it's the same prize as always!