Quick Links
The Legend of Zelda: Tears of the Kingdom's Utsushok Shrine is a fairly simple challenge that asks you to build some of the game's most satisfying contraptions. It has no enemies and no risky maneuvers. You can take this shrine on at your own pace.
Located in the central part of the Faron Grasslands, the Utsushok Shrine is just a stone's throw away from the Highland Stable. Additionally, the shrine isn't far from the Horse God Bridge and Malanya's old stomping grounds, and it might be worth it to challenge this shrine if you're interested in what secrets this area has to offer.
How To Complete Utsushok Shrine: Long Or Wide

The first puzzle you're faced with has one simple goal: knock the large orange ball into the bowl-like switch device at the end of the rails. To do this, you have one large paddle that you can pull and push with Ultrahand.
Use your Ultrahand to select the paddle and walk Link onto the top of the incline behind it. Push it as far upward as possible and then let go to smack the ball toward the switch.
As the switch turns green, the gate to your left will open. Go through to the next puzzle where you'll spy a metal box now added to the puzzle.

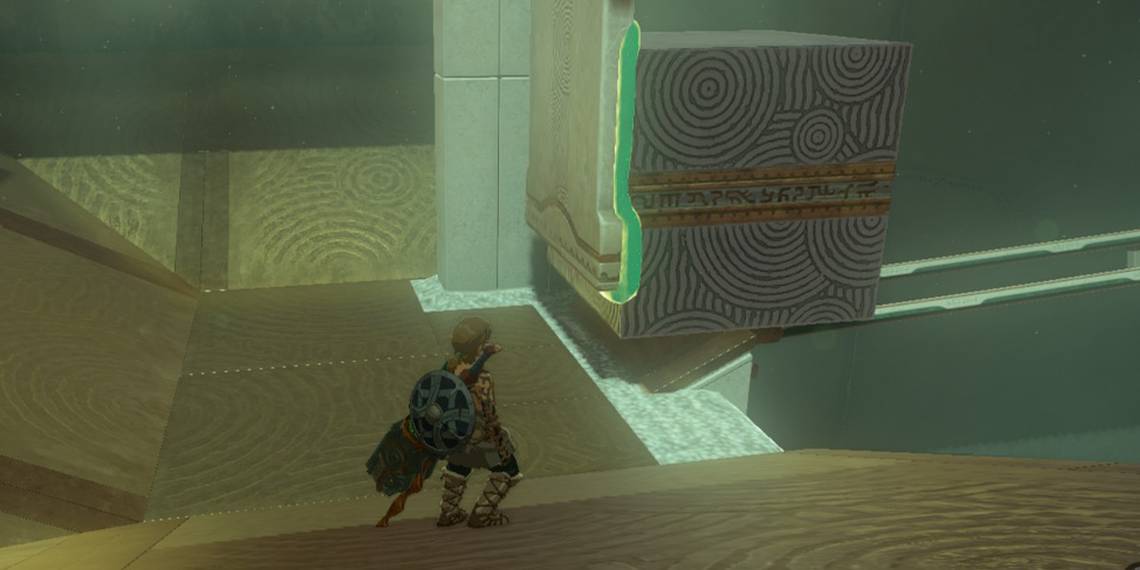
Pick up the metal box and attach it to the front of the paddle. You will need to remove the orange ball and put it off to the side in order to place the box on the paddle successfully, but put it back on once it's settled.
Make certain that the box is placed low enough on the paddle to fully strike the ball, but don't place it on the bottom of the paddle (you'll catch it on the rails).

Just like in the previous room, stand behind the paddle at the top of the ramp and grab the paddle with Ultrahand. Raise the paddle as high as you can, and drop it to hit the ball into the far switch.
When the gate has been opened, travel through it into the next two-stage puzzle.

The first part of the final puzzle requires you to take the large metal board with Ultrahand and stick it to the back or front of the paddle vertically. You can't place it under the paddle; otherwise, it won't fit.
Lift the metal board, back up, and once the board-paddle is as high as you can push it, drop it to strike the ball.
Once the ball is in the far switch, a mine cart will drop onto the nearby rail.

Detach the metal board and rotate it until it's lined perpendicular to the paddle (horizontal). Attach it to the side of the paddle so that the board rests like another giant paddle behind the mine cart.
Jump into the mine cart and use your Ultrahand to push the paddle as far up as you can. Let go and send yourself launching down the rail.

There's a chest off to the left side of the rail. To reach it, you'll need to use your Ultrahand while in motion to grab it, holding it until you reach the end where you can let go and jump off to claim the prize of a Stealthy Elixir.
With your Stealthy Elixir in your pocket, march over to the end of the shrine.
If you miss the chest while in motion, don't worry. The mine cart will slowly begin rolling back once it reaches the end, so take the mine cart backward for another try. Relaunch yourself with the paddle when on that side and repeat as many times as necessary.